


NetworkSherlock is a powerful and flexible port scanning tool designed for network security professionals and penetration testers. With its advanced capabilities, NetworkSherlock can efficiently scan IP ranges, CIDR blocks, and multiple targets.
It stands out with its detailed banner grabbing capabilities across various protocols and integration with Shodan, the world’s premier service for scanning and analyzing internet-connected devices. This Shodan integration enables NetworkSherlock to provide enhanced scanning capabilities, giving users deeper insights into network vulnerabilities and potential threats.
By combining local port scanning with Shodan’s extensive database, NetworkSherlock offers a comprehensive tool for identifying and analyzing network security issues.
Features
- Scans multiple IPs, IP ranges, and CIDR blocks.
- Supports port scanning over TCP and UDP protocols.
- Detailed banner grabbing feature.
- Ping check for identifying reachable targets.
- Multi-threading support for fast scanning operations.
- Option to save scan results to a file.
- Provides detailed version information.
- Colorful console output for better readability.
- Shodan integration for enhanced scanning capabilities.
- Configuration file support for Shodan API key.
Installation
NetworkSherlock requires Python 3.6 or later.
- Clone the repository:
git clone https://github.com/HalilDeniz/NetworkSherlock.git - Install the required packages:
pip install -r requirements.txt
Configuration
Update the networksherlock.cfg file with your Shodan API key:
[SHODAN]
api_key = YOUR_SHODAN_API_KEY
Usage
python3 networksherlock.py --help
usage: networksherlock.py [-h] [-p PORTS] [-t THREADS] [-P {tcp,udp}] [-V] [-s SAVE_RESULTS] [-c] target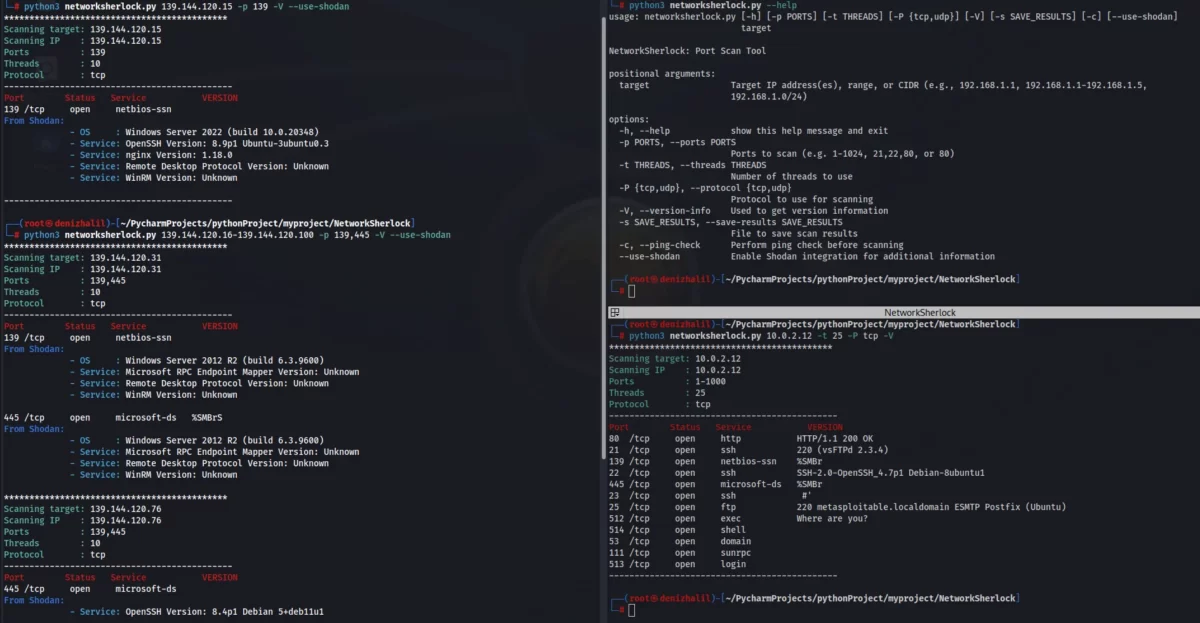
NetworkSherlock: Port Scan Tool
positional arguments:
target Target IP address(es), range, or CIDR (e.g., 192.168.1.1, 192.168.1.1-192.168.1.5,
192.168.1.0/24)
options:
-h, --help show this help message and exit
-p PORTS, --ports PORTS
Ports to scan (e.g. 1-1024, 21,22,80, or 80)
-t THREADS, --threads THREADS
Number of threads to use
-P {tcp,udp}, --protocol {tcp,udp}
Protocol to use for scanning
-V, --version-info Used to get version information
-s SAVE_RESULTS, --save-results SAVE_RESULTS
File to save scan results
-c, --ping-check Perform ping check before scanning
-ad, --arp-discover: Perform ARP discovery on the specified network.
--use-shodan Enable Shodan integration for additional information
Basic Parameters
target: The target IP address(es), IP range, or CIDR block to scan.
-p, --ports: Ports to scan (e.g., 1-1000, 22,80,443).
-t, --threads: Number of threads to use.
-P, --protocol: Protocol to use for scanning (tcp or udp).
-V, --version-info: Obtain version information during banner grabbing.
-s, --save-results: Save results to the specified file.
-c, --ping-check: Perform a ping check before scanning.
--use-shodan: Enable Shodan integration.
Also See – Karma V2 Passive Open Source Intelligence OSINT Automated Framework
Example Usage
Basic Port Scan
Scan a single IP address on default ports:
python networksherlock.py 192.168.1.1Custom Port Range
Scan an IP address with a custom range of ports:
python networksherlock.py 192.168.1.1 -p 1-1024Multiple IPs and Port Specification
Scan multiple IP addresses on specific ports:
python networksherlock.py 192.168.1.1,192.168.1.2 -p 22,80,443CIDR Block Scan
Scan an entire subnet using CIDR notation:
python networksherlock.py 192.168.1.0/24 -p 80Using Multi-Threading
Perform a scan using multiple threads for faster execution:
python networksherlock.py 192.168.1.1-192.168.1.5 -p 1-1024 -t 20Scanning with Protocol Selection
Scan using a specific protocol (TCP or UDP):
python networksherlock.py 192.168.1.1 -p 53 -P udpScan with Shodan
python networksherlock.py 192.168.1.1 --use-shodanScan Multiple Targets with Shodan
python networksherlock.py 192.168.1.1,192.168.1.2 -p 22,80,443 -V --use-shodanBanner Grabbing and Save Results
Perform a detailed scan with banner grabbing and save results to a file:
python networksherlock.py 192.168.1.1 -p 1-1000 -V -s results.txtPing Check Before Scanning
Scan an IP range after performing a ping check:
python networksherlock.py 10.0.0.1-10.0.0.255 -cOUTPUT EXAMPLE
$ python3 networksherlock.py 10.0.2.12 -t 25 -V -p 21-6000 -t 25Scanning target: 10.0.2.12
Scanning IP : 10.0.2.12
Ports : 21-6000
Threads : 25Protocol : tcp
Port   Status Service   VERSION
22 /tcp open  ssh  SSH-2.0-OpenSSH_4.7p1 Debian-8ubuntu1
21 /tcp open  telnet 220 (vsFTPd 2.3.4)
80 /tcp open  http HTTP/1.1 200 OK
139 /tcp open netbios-ssn %SMBr
25 /tcp  open smtp 220 metasploitable.localdomain ESMTP Postfix (Ubuntu)
23 /tcp  open smtp #' #'
445 /tcp open microsoft-ds %SMBr
514 /tcp open shell
512 /tcp open exec Where are you?
1524/tcp open ingreslock root@metasploitable:/#
2121/tcp open iprop 220 ProFTPD 1.3.1 Server (Debian) [::ffff:10.0.2.12]
3306/tcp open mysql >
5900/tcp open unknown RFB 003.003
53 /tcp open domain
OutPut Example
$ python3 networksherlock.py 10.0.2.0/24 -t 10 -V -p 21-1000Scanning target: 10.0.2.1
Scanning IP : 10.0.2.1
Ports : 21-1000
Threads : 10Protocol : tcp
Port Status Service VERSION
53 /tcp open domain
Scanning target: 10.0.2.2
Scanning IP : 10.0.2.2
Ports : 21-1000
Threads : 10Protocol : tcp
Port Status Service VERSION
445 /tcp open microsoft-ds
135 /tcp open epmap
Scanning target: 10.0.2.12
Scanning IP : 10.0.2.12
Ports : 21-1000
Threads : 10Protocol : tcp
Port Status Service VERSION
21 /tcp open ftp 220 (vsFTPd 2.3.4)
22 /tcp open ssh SSH-2.0-OpenSSH_4.7p1 Debian-8ubuntu1
23 /tcp open telnet #'
80 /tcp open http HTTP/1.1 200 OK
53 /tcp open kpasswd 464/udpcp
445 /tcp open domain %SMBr
3306/tcp open mysql >
Scanning target: 10.0.2.20
Scanning IP : 10.0.2.20
Ports : 21-1000
Threads : 10Protocol : tcp
Port Status Service VERSION
22 /tcp open ssh SSH-2.0-OpenSSH_8.2p1 Ubuntu-4ubuntu0.9
Contributing
Contributions are welcome! To contribute to NetworkSherlock, follow these steps:
Fork the repository.
- Create a new branch for your feature or bug fix.
- Make your changes and commit them.
- Push your changes to your forked repository.
- Open a pull request in the main repository.