


In December 2021, the Apache Log4Shell vulnerability (CVE-2021-44228) was published. Within 12 hours, scanning for vulnerable systems had begun at scale. Within 72 hours, exploitation attempts numbered in the millions.
Organisations with a mature vulnerability management programme knew within hours which of their systems ran a vulnerable version of Log4j — they had an asset inventory, they had a software bill of materials, and they had a process for emergency patch deployment. They patched in days.
Organisations without a vulnerability management programme spent weeks manually searching codebases and inventories they did not know were incomplete, patching systems they did not know they had, and hoping that attackers had not found them first.
Log4Shell was not unusual in its speed of exploitation — it was representative of the modern threat landscape. The Rapid7 Vulnerability Intelligence Report found that the median time from vulnerability disclosure to active exploitation in the wild is now 12 days.
Many critical vulnerabilities are exploited within hours of publication. An organisation that patches CRITICAL vulnerabilities in 30 days is — in practice — patching after the majority of exploitation attempts have already occurred against that vulnerability.
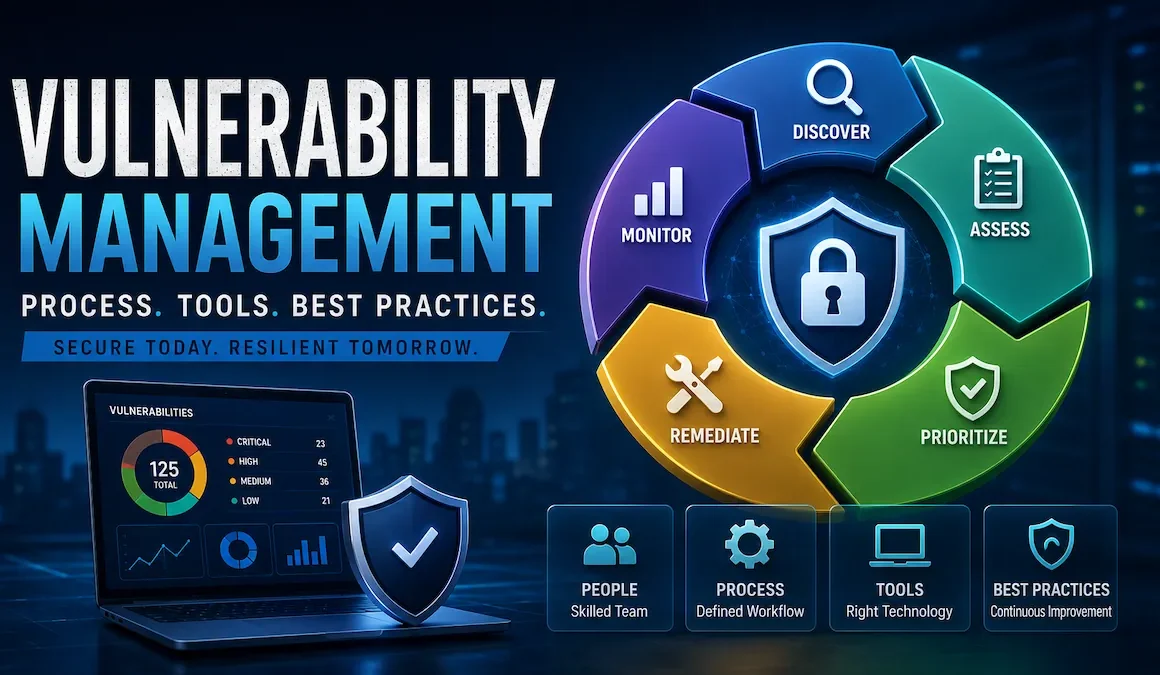
Vulnerability management is the continuous process of identifying, classifying, prioritising, remediating, and verifying security vulnerabilities in an organisation's technology environment.
This guide covers the complete enterprise vulnerability management lifecycle: the six-phase process, CVSS scoring and risk-based prioritisation, the vulnerability scanning toolchain (Nessus, Qualys, Rapid7, OpenVAS, Trivy), patch management SLAs, metrics and KPIs that prove programme effectiveness, and the common programme failures that turn vulnerability management into a compliance exercise rather than a security outcome.
- The vulnerability management lifecycle — six phases
- Phase 1 — Asset discovery and inventory
- Phase 2 — Vulnerability scanning
- Phase 3 — CVSS scoring and risk-based prioritisation
- Phase 4 — Remediation and patch management
- Phase 5 — Verification and validation
- Phase 6 — Reporting and continuous improvement
- Vulnerability scanning tools — enterprise comparison
- Patch SLAs and policy framework
- KPIs and metrics that prove programme effectiveness
- Best practices and common programme failures
- Frequently asked questions
Vulnerability management is not a one-time audit — it is a continuous cycle. The moment a scan is complete, new vulnerabilities are disclosed, new assets are deployed, and new configurations are changed. A mature programme runs continuously, with scanning on defined schedules, prioritisation in near-real-time as new CVEs are published, and remediation tracked through to verified closure.
Every vulnerability management programme fails or succeeds based on the completeness of the asset inventory. An asset that is not in the inventory is not scanned. An asset that is not scanned is not patched. An unpatched asset with a known critical vulnerability that the organisation does not know exists is more dangerous than a patched system the organisation knows about, because it provides attackers with a blind-spot entry point.
- Network scanning discovery: Nmap, Masscan, or the scanner's own discovery module scans IP ranges and identifies active hosts. Fast and comprehensive for on-premises networks; requires appropriate network access. Run discovery scans weekly — new devices appear regularly.
- Active Directory / LDAP query: Pull all computer objects from AD. Covers all domain-joined Windows systems. Does not cover non-Windows, cloud, or unmanaged devices.
- Cloud provider APIs: AWS (describe-instances, describe-buckets), Azure (az vm list), GCP (gcloud compute instances list). Pull all cloud assets programmatically. Essential for cloud-heavy environments — cloud assets spin up and down constantly. Integrate with CSPM tools (Prisma Cloud, Wiz, Orca) for continuous cloud asset visibility.
- MDM / endpoint management: Microsoft Intune, Jamf, or SCCM asset lists cover managed endpoints. Combine with network discovery to identify unmanaged devices (shadow IT).
- CMDB integration: If a CMDB (ServiceNow, BMC Remedy) exists, sync with it — the CMDB may have business context (asset owner, criticality, business function) that enriches the vulnerability management data. Note: CMDBs are frequently stale — never rely solely on CMDB without validation against discovery scans.
- Container and Kubernetes inventory: kubectl get nodes, kubectl get pods -A, and container registry APIs. Container environments are particularly dynamic — asset discovery must be continuous rather than scheduled.
Not every asset carries the same risk. Assign criticality tiers to assets based on business impact — this drives scan frequency, patch SLAs, and remediation prioritisation for vulnerabilities on those assets.
| Tier | Definition | Examples | Scan frequency | CRITICAL patch SLA |
|---|---|---|---|---|
| Tier 1 — Critical | Compromise causes immediate, severe business impact or regulatory breach | Domain controllers, payment systems, PII databases, internet-facing web apps, CA servers | Daily (agent) or weekly (network) | 24 hours |
| Tier 2 — High | Compromise causes significant disruption or significant data exposure | Application servers, file servers, cloud production workloads, ERP systems | Weekly | 7 days |
| Tier 3 — Medium | Compromise causes limited disruption; data exposure limited in scope | Developer workstations, internal business applications, test environments | Monthly | 30 days |
| Tier 4 — Low | Compromise has minimal business impact | Decommission-pending systems, isolated lab environments, printers | Quarterly | 90 days |
A vulnerability scan identifies software versions, configurations, and missing patches on each asset and compares them against a database of known vulnerabilities (NVD, vendor advisories). The quality of scan results depends critically on authentication: unauthenticated scans can only detect what is visible from the network (open ports, service banners) and miss the majority of vulnerabilities that require OS-level access to detect (missing patches, insecure configurations, installed software CVEs). An unauthenticated scan produces a false sense of security — it shows a small number of findings when hundreds may exist.
- Authenticated network scan: Scanner connects to the target over the network using privileged credentials (SSH for Linux, WMI/SMB for Windows). Detects: missing patches, installed software CVEs, OS configuration issues, user account settings. The standard scan type for infrastructure vulnerability management. Requires credential management — use a dedicated scan account with local admin rights, never domain admin.
- Agent-based scan: A lightweight agent installed on the endpoint runs scans locally and reports to the central VM platform. Advantages: works on endpoints not reachable by the network scanner (remote workers, off-VPN laptops), no credential management required, runs continuously rather than on schedule, lower network impact. Disadvantages: requires agent deployment and management. Best for: endpoints, laptops, cloud VMs.
- Unauthenticated / external scan: Simulates an external attacker's view — scans internet-facing assets without credentials. Finds: exposed services, missing TLS configurations, publicly accessible sensitive files, web application vulnerabilities visible externally. Run monthly against all internet-facing assets. Also run from a dedicated external IP to avoid firewall whitelist effects.
- Web application scan: DAST (Dynamic Application Security Testing) scans the running web application for OWASP Top 10 vulnerabilities — SQL injection, XSS, CSRF, authentication issues, misconfigured headers. Tools: OWASP ZAP, Burp Suite Enterprise, Nuclei. Separate from infrastructure vulnerability scanning.
- Container image scan: Scans container images for OS package CVEs and application dependency vulnerabilities. Tools: Trivy, Grype, Anchore. Runs in CI/CD pipeline at build time and against the container registry continuously.
The vulnerability scanner stores credentials to authenticate to every scanned system. If the scanner is compromised, all those credentials are compromised. Scanner infrastructure must be hardened: dedicated VLAN with strict firewall rules, no internet access, credential storage encrypted, MFA for scanner console access, and scan credentials rotated quarterly. The scan account should have no interactive login rights and no ability to make configuration changes — read-only access for vulnerability detection is sufficient for most scan types.
The Common Vulnerability Scoring System (CVSS) provides a standardised severity score from 0.0 to 10.0 based on six base metrics: Attack Vector, Attack Complexity, Privileges Required, User Interaction, Scope, and the CIA impact (Confidentiality, Integrity, Availability). CVSS is useful for standardised severity comparison but is not a complete prioritisation system — it describes the worst-case theoretical severity of a vulnerability, not the likelihood that it will be exploited against your organisation in the near term.
CVSS alone produces massive backlogs of medium-severity findings that cannot all be patched quickly. The average enterprise has 57,000 open vulnerability findings — treating everything equally is impossible. Risk-based prioritisation combines four factors to determine true remediation priority:
The CISA Known Exploited Vulnerabilities catalogue is the most actionable threat intelligence feed for vulnerability prioritisation. It lists CVEs that CISA has confirmed are being actively exploited by real threat actors — not theoretically exploitable, but actually used in attacks. The catalogue currently contains over 1,100 CVEs with mandatory remediation timelines for US federal agencies (typically 2 weeks). Any organisation should treat KEV entries as automatically promoted to the top of the remediation queue, regardless of CVSS score. Several KEV entries have CVSS scores below 7.0 — they would be deprioritised by CVSS-only programmes but are being exploited in the wild.
- Patch: Apply the vendor-supplied patch or update. The preferred treatment for the vast majority of vulnerabilities. Patching should be automated wherever possible — WSUS/SCCM/Intune for Windows, yum-cron/unattended-upgrades for Linux, cloud-native patch managers (AWS Systems Manager, Azure Update Manager) for cloud VMs.
- Mitigate / compensating control: When a patch is not available (zero-day) or cannot be applied immediately (business change freeze, compatibility issues), implement a compensating control that reduces the exploitability or impact: disable the vulnerable feature, add network-layer access controls, block the exploit path at the WAF, or isolate the affected system. Document the compensating control and set a deadline for the patch.
- Accept risk: Acknowledge that a vulnerability exists and consciously decide not to remediate it — because the exploitation risk is low (low EPSS, unexploitable in context), the remediation cost exceeds the risk value, or a mitigating control already reduces risk to an acceptable level. Risk acceptance must be documented, risk-owned by a named individual, time-limited (typically 90-day renewable), and reviewed at each re-scan.
- Transfer: Move the financial risk to a third party — cyber insurance. Note: insurance does not reduce the likelihood of exploitation; it only changes who bears the financial cost. Transfer is appropriate in combination with other treatments, not as a standalone approach.
Critical security patches for internet-facing systems should be applied as quickly as possible — test in a staging environment in parallel rather than sequentially. For non-critical patches: test in a representative environment (same OS version, same application stack), observe for 48–72 hours, then roll out in waves (10% of fleet → 25% → 100%). Canary deployments for patches reduce the blast radius of a patch causing application failures in production. Always have a tested rollback procedure before deploying patches to production.
Verification confirms that the remediation action actually resolved the vulnerability. Vulnerabilities are only marked as closed when a subsequent scan confirms they are no longer present. Common reasons vulnerabilities reappear after "patching": patch was applied but the service was not restarted (so the old version is still running in memory), patch was applied to one node but not others in a cluster, a new VM was deployed from an unpatched image template, or the patch was rolled back due to a compatibility issue without a compensating control being applied.
- Rescan after remediation: Schedule a targeted rescan of the specific asset within 24–48 hours of the patch being applied. Confirm the CVE is no longer present before closing the ticket.
- Automated verification in CI/CD: For containerised workloads, Trivy or Grype scans as part of the deployment pipeline confirm the deployed image is patch-compliant before it reaches production. The pipeline fails and the deployment is blocked if a CRITICAL CVE is present.
- Penetration testing validation: Annual (or more frequent) penetration tests validate that prioritised remediation is effective — a pen tester attempting to exploit previously identified vulnerabilities and confirming they cannot is the highest-confidence validation method.
- Compliance scan for audit evidence: For vulnerabilities tied to regulatory requirements (PCI DSS quarterly ASV scans, ISO 27001 A.8.8), the verification scan produces the audit evidence required to demonstrate compliance.
Vulnerability data must be translated into the right format for each audience. A raw scan report with 57,000 findings is not useful to anyone. A structured report that shows: trend of CRITICAL and HIGH findings over time, MTTR against SLA, KEV exposure count, and percentage of assets scanned — is actionable for IT teams and interpretable by leadership.
- Operational report (weekly, for IT/security teams): Open CRITICAL/HIGH findings by asset owner, overdue findings (SLA breached), new findings from most recent scan, findings closed this week. Drives the patch queue.
- Management report (monthly, for CISO and IT leadership): MTTR trend by severity, total open findings by severity and age, SLA compliance rate, scan coverage percentage, top vulnerable assets and systems, KEV exposure. Shows programme performance.
- Executive/board report (quarterly): Vulnerability risk trend (is the programme improving?), comparison against industry benchmarks, CRITICAL and KEV exposure summary, key remediation achievements, and investment required for programme improvement. Business language — risk dollars not CVE IDs.
Each scan cycle should answer: which assets have the highest concentration of vulnerabilities (systemic patching or asset management failure?), which vulnerabilities keep reappearing (patch process failure? image template not updated?), which asset owners are consistently missing SLAs (resourcing issue? awareness issue?), and where is the scanning coverage gap (assets not being scanned at all). Quarterly programme reviews should update asset criticality tiers, scan schedules, SLA targets, and prioritisation weights based on observed patterns and evolving threat intelligence.
| Tool | Type | Coverage | EPSS / KEV | Best for | Licence |
|---|---|---|---|---|---|
| Tenable Nessus Professional | Network + agent | OS, apps, network devices, cloud, containers | Yes (EPSS + Tenable VPR score) | Mid-size to enterprise on-premises and hybrid environments. Most comprehensive plugin library (200,000+ checks). | Commercial |
| Tenable.io / Vulnerability Management | Cloud SaaS + agent | Same as Nessus + cloud assets + web apps + identity | Yes (VPR = CVSS + EPSS + threat intel) | Enterprise cloud-heavy environments needing unified visibility across cloud + on-prem + containers. | Commercial |
| Qualys VMDR | Cloud SaaS + agent | OS, apps, containers, cloud assets, web apps, OT | Yes (QDS score) | Large enterprises needing compliance + VM in one platform. Strong PCI DSS ASV scanning capability. | Commercial |
| Rapid7 InsightVM | Cloud SaaS + agent + network | OS, apps, containers, cloud, web | Yes (EPSS integrated) | Enterprises wanting strong integration with Rapid7 SIEM (InsightIDR) and incident response toolchain. | Commercial |
| OpenVAS / Greenbone | Network scanner | OS, apps, network devices — 75,000+ tests | Partial (community plugins) | Budget-conscious organisations. Free community edition (Greenbone Community) covers most infrastructure needs. Requires more tuning than commercial tools. | Open-source (GPL) |
| Trivy (Aqua Security) | Container/IaC/filesystem | Container images, Kubernetes, IaC, filesystems, SBOMs | Yes (EPSS scores in v0.47+) | DevSecOps pipelines and cloud-native environments. Best-in-class container vulnerability scanning. Free. | Open-source (Apache) |
| Grype (Anchore) | Container/SBOM | Container images, SBOMs, filesystems | Yes (EPSS integrated) | CI/CD pipeline scanning; SBOM-based vulnerability detection. Works well alongside Syft for SBOM generation. | Open-source (Apache) |
| Nuclei (ProjectDiscovery) | Web/API/network | CVEs, misconfigs, web, API, network services — 9,000+ templates | Partial | Fast, template-based scanning for specific CVEs and misconfigurations. Excellent for DevSecOps and targeted verification scanning. | Open-source (MIT) |
| Microsoft Defender Vulnerability Management | Agent-based (Windows/Linux/macOS) | OS, apps, browser plugins, certificates, network shares | Yes (CVSS + exposure score) | Microsoft-heavy enterprises already using Defender for Endpoint. Zero additional deployment cost for Defender E5 customers. | Commercial (included in E5) |
| Wiz / Orca Security / Prisma Cloud | Cloud CSPM + agentless scanning | Cloud resources, containers, Kubernetes, IaC, secrets, identities | Yes | Cloud-native enterprises. Agentless scanning of cloud VMs without deploying agents. Combines VM with CSPM and CIEM. | Commercial |
- ✓Complete asset inventory before any scanning begins — a scan against an incomplete inventory produces a false sense of security. The assets not in inventory are the ones most likely to be unpatched (unknown to IT operations and therefore never patched).
- ✓Always use authenticated scanning — unauthenticated scans find 10–20% of vulnerabilities that authenticated scans find. Never report programme health based on unauthenticated scan data. If scan credentials are failing on a portion of assets, that is the metric to report and fix.
- ✓Subscribe to CISA KEV and treat KEV entries as emergency patches — free, highly actionable threat intelligence. Any KEV CVE in your environment is known to be exploited in the wild and must be patched within 14 days maximum regardless of asset tier. Set up automated KEV alerting against your scan results.
- ✓Integrate EPSS scores into prioritisation — CVSS-only prioritisation treats a 9.8 CVE that has never been exploited the same as a 7.5 CVE being actively exploited in ransomware campaigns. EPSS provides exploitation probability. Free API from first.org or native in Tenable, Qualys, and Rapid7.
- ✓Assign asset owners and make SLA compliance their accountability — vulnerability management fails when remediation is the security team's problem rather than the asset owner's. The security team identifies and prioritises. The asset owner and their team patch. SLA compliance is an operational metric for system owners, not a security team metric.
- ✓Integrate the VM platform with your ITSM (ServiceNow, Jira) — automatically create remediation tickets from scan findings, assign to the correct team, set due dates based on SLA policy, and track closure status back to the scanner. Manual ticket creation is slow, error-prone, and produces stale data.
- ✓Deploy agents on all managed endpoints — agents eliminate the coverage gap for laptops that are off-network, VMs that are network-unreachable from the scanner, and assets behind NAT. Agent-based scanning is the only way to maintain continuous visibility for endpoints.
- ✓Include container and cloud assets in the programme scope — traditional VM programmes cover on-premises infrastructure but miss container images, serverless functions, cloud-native services, and cloud VMs deployed without the scanner agent. Cloud and container vulnerabilities are growing faster than traditional OS vulnerabilities.
- ✓Establish a formal exception and risk acceptance process — without it, the programme either has 100% compliance on paper (because exceptions are undocumented) or teams self-approve delays. A documented exception process with risk owner sign-off makes risk acceptance visible, time-limited, and auditable.
| Failure mode | Symptom | Root cause | Fix |
|---|---|---|---|
| Compliance-theatre scanning | Scans run monthly on schedule but findings are never actioned | No accountability for remediation; no SLA enforcement; VM seen as audit exercise | Assign asset owners; make SLA compliance a management KPI; escalation process for breaches |
| Unauthenticated scanning | Low finding count; findings seem manageable; major breach occurs | Scan credentials not configured; credential management difficult; false assurance from low finding count | Invest in credential management; use agent-based scanning as fallback; report authenticated scan rate as a KPI |
| Incomplete asset inventory | Ransomware spreads through an "unknown" server; attacker pivots through unscanned device | Asset inventory not maintained; shadow IT; cloud sprawl | Continuous discovery scanning; cloud API integration; MDM for endpoint visibility; compare scan results to DHCP logs |
| CVSS-only prioritisation | Team patches low-risk theoretical vulnerabilities while actively-exploited CVEs wait | No EPSS or KEV integration; CVSS scores drive the queue | Integrate EPSS; check CISA KEV daily; weight by asset criticality; re-sort the queue |
| No verification scanning | "Patched" vulnerabilities reappear; closure rate looks good but assets remain exploitable | Findings closed based on change tickets without confirmation scanning | Mandate re-scan before closure; automated verification scan triggered by ticket closure |
| Scanner island — no ITSM integration | IT teams not aware of vulnerabilities; security team manually creating tickets; stale data | VM platform and ITSM not integrated; manual handoff | API integration between VM platform and ServiceNow/Jira; auto-ticket creation with SLA due dates |
⚡ Start your vulnerability management programme — first four actions
- Download the CISA KEV catalogue and check it against your environment today — it takes 30 minutes. Download the JSON feed from cisa.gov/known-exploited-vulnerabilities-catalog. Extract the CVE IDs. Cross-reference against your existing scan results or asset inventory. Any match is a vulnerability that is known to be actively exploited in the wild and must be your first remediation priority. Set up a daily automated check: curl -s https://www.cisa.gov/sites/default/files/feeds/known_exploited_vulnerabilities.json | jq -r '.vulnerabilities[].cveID'
- Run your first authenticated vulnerability scan within 7 days. If you have Nessus Essentials (free for up to 16 IPs), Tenable.io trial, or OpenVAS — set up one authenticated scan against your most critical 10 servers. Use the scan results to: measure how complete your patch management has been, identify what CRITICAL and HIGH findings exist right now, and build the business case for expanding the programme. A CISO who walks into a board meeting with "we have 3 unpatched Log4Shell-severity vulnerabilities on production systems" has a budget conversation. A CISO without scan data does not.
- Define your patch SLAs in a one-page policy this week. Use the template in Section 9 as a starting point. Get it signed by the CISO or CTO. Distribute it to all IT system owners. The SLA without enforcement is an aspiration; the SLA with a monthly SLA compliance KPI reported to management is a control. Start measuring SLA compliance from the date the policy is signed.
- Connect vulnerability management to your broader security programme. Vulnerability management feeds and is fed by: asset inventory (CMDB or cloud APIs), change management (patch deployments are changes), incident response (vulnerabilities exploited in incidents → priority remediation), DevSecOps (scan in CI/CD pipeline), and risk management (unpatched vulnerabilities are risks in the risk register). DevSecOps and CI/CD scanning → | Incident response → | Container vulnerability scanning → | Cloud vulnerability management →
Vulnerability management is the continuous process of identifying, classifying, prioritising, remediating, and verifying security vulnerabilities in an organisation's technology environment. It is not a one-time scan or annual audit — it is an ongoing cycle that operates continuously as new vulnerabilities are disclosed daily, new assets are deployed, and configurations change. A mature vulnerability management programme maintains a complete asset inventory, scans all assets on defined schedules using authenticated credentials, prioritises findings by exploitation probability (EPSS) and known exploitation (CISA KEV) rather than CVSS score alone, tracks remediation to verified closure, and measures programme effectiveness through KPIs including MTTR, SLA compliance rate, and scan coverage percentage.
CVSS (Common Vulnerability Scoring System) is a standardised framework for rating the severity of security vulnerabilities on a scale from 0.0 to 10.0. Scores are categorised as Critical (9.0–10.0), High (7.0–8.9), Medium (4.0–6.9), and Low (0.1–3.9). CVSS is useful for standardised severity comparison but is not a complete prioritisation framework — it describes the theoretical worst-case severity of a vulnerability, not the likelihood that it will be exploited against your organisation. CVSS-only prioritisation treats a 9.8 CVE that has never been exploited the same as a 7.5 CVE being actively used in ransomware campaigns. Effective prioritisation combines CVSS with EPSS (Exploit Prediction Scoring System — exploitation probability in the next 30 days), the CISA KEV catalogue (known active exploitation), and asset criticality tier.
The CISA Known Exploited Vulnerabilities (KEV) catalogue is a free, continuously updated list of CVEs that CISA has confirmed are being actively exploited by real threat actors in the wild. It currently contains over 1,100 vulnerabilities. US federal agencies are required to patch KEV entries within defined timelines (typically 2 weeks). For any organisation, KEV entries should be treated as the highest remediation priority regardless of CVSS score — several KEV entries have CVSS scores below 7.0 that would be deprioritised by CVSS-only programmes, yet are being actively used in attacks. The KEV feed is available at cisa.gov/known-exploited-vulnerabilities-catalog in JSON format and can be integrated into vulnerability management platforms or checked daily via a simple API query against your scan results.
An authenticated scan uses credentials (Windows admin account, SSH key) to log into each scanned system and inspect it from the inside — checking installed software versions, missing patches, OS configurations, and security settings. An unauthenticated scan only sees what is visible from the network — open ports, service banners, and network-level vulnerabilities. Authenticated scans typically find 5–10 times more vulnerabilities than unauthenticated scans of the same system. Running only unauthenticated scans produces a false sense of security — the finding count looks manageable because the majority of vulnerabilities are simply not visible. Always use authenticated scanning for internal assets. Reserve unauthenticated scanning for external attack surface scanning (simulating an external attacker's view of internet-facing services).
Industry benchmark SLAs for enterprise vulnerability management: CRITICAL vulnerabilities (CVSS 9.0+ or in CISA KEV) should be patched within 24–48 hours on Tier 1 (critical) assets and within 7 days on lower-tier assets. HIGH vulnerabilities (CVSS 7.0–8.9) should be patched within 7 days on Tier 1 assets and 14–30 days on others. MEDIUM vulnerabilities within 30–60 days. LOW within 90 days or the next quarterly patch cycle. These SLAs apply from the date the vulnerability appears in a scan result, not from the date the CVE was publicly disclosed. Mature programmes (MTTR under 9 days for CRITICAL) consistently outperform these targets; average programmes take 30–60 days for CRITICAL vulnerabilities. SLAs without measurement and enforcement are aspirations — the programme must track SLA compliance rate as a reported KPI.
The most widely used enterprise vulnerability scanning tools are: Tenable Nessus / Tenable.io (most comprehensive plugin library, strong cloud integration, native EPSS and KEV integration), Qualys VMDR (cloud SaaS, strong compliance scanning, PCI DSS ASV capability), and Rapid7 InsightVM (strong SIEM integration, good for organisations also using InsightIDR). For cloud-native environments: Wiz and Orca Security provide agentless scanning of cloud assets without deploying agents. For container and DevSecOps pipelines: Trivy (open-source, excellent CI/CD integration) and Grype (Anchore, SBOM-based scanning). For open-source infrastructure scanning: OpenVAS/Greenbone Community Edition. Microsoft Defender Vulnerability Management is worth enabling for Microsoft E5 customers at zero additional cost. Most enterprises use a combination — a primary scanner for infrastructure plus a specialised tool for containers and cloud.